Friday, September 28, 2012

Kid tested.... teacher approved

I love my job.  I love the outlook on life that kids have.  They are so innocent.  They say the cutest things.  I love incorporating cooking into the classroom.  One year, we read "The Enormous Turnip."  I decided to make mashed turnips in the classroom.  As a little kid, I would have NEVER tried this.  But, if my teacher made it, I may have! Well, that is exactly what happened with my class.  They LOVED the fact that we made something in class.  They ate every last bite.  I had parents e-mailing me afterwards, asking me for the 'delicious turnip recipe' that we made.  It was nothing special, but it was made at school... with their teacher!  It was so great introducing them to something that they would have otherwise never tried.  Well, this past week was Johnny Appleseed's birthday (September 26th to be exact).  We did some apple tasting on Tuesday.  It was hilarious watching their sour faces when they bit into the green apple.  I thought it would be fun to make homemade applesauce in the classroom.  The kids are so excited.  We are also having a pajama party all day because we have earned all of our compliments.  Pajama party and homemade applesauce... at school.... this is definitely a recipe for a great day!

This recipe was kid tested and approved by 17 six year olds, and one extremely happy teacher.

Ingredients:
6 apples, peeled and chopped
2 tablespoons cinnamon
2 tablespoons sugar
1/2 cup water


Directions:


1. Peel all of the apples. (I did this step at home)


2. Chop all of the apples into 1 inch cubes.  (I also did this at home)


3. Add the apples to the crock-pot.


4. Add the cinnamon to the crock-pot.


5. Add the sugar to the crock-pot.


6. Mix well.  (The kids helped me out with this!)


7. Heat on high for 2-3 hours.  Remove the cover and mash the apples with a wooden spoon.


8. Let the applesauce cool, and serve! I served it in these little cups.  This recipe was definitely kid approved! 
Until next time...
-A 

Mini-Rum Cupcakes with Whipped Cream

My husband's birthday was on Wednesday.  Every year, I make him a dessert.  I have done red velvet cake, boston cream pie, key lime pie, fun-fetti cupcakes, and probably many more that I can't think of.  Well, since he wasn't here to celebrate his birthday with me, we are going to be celebrating in Tampa this weekend for the Florida State game.  I decided to make yet another dessert.  I thought hard.  I needed to make something that he would like, but also something that I could bring to a tailgate.  Then I  thought of this clever idea... rum cake... in jello shot cups, with whipped cream on top.  So, instead of jello shots for the tailgate, we will be having rum cake shots.  It fits the criteria... birthday celebration and tailgating snacks... all in one.

Ingredients:

For the cupcakes:
1 box of Golden Butter cake mix
1 package INSTANT Vanilla Pudding mix
4 whole eggs
1/2 cold water
1/2 vegatable oil
1/2 cup Malibu Coconut Rum
You will need a little rum to top them off after they are cooked.


For the whipped cream:
1 cup (8 oz.) heavy whipped cream
3 tablespoons sugar

Directions for the cupcakes:


1. Add all of the ingredients for the cake mix in a medium sized bowl.  


2. Whisk the mixture until it is smooth.


These are the Jello shot cups that I used.


3. Place the jello shot cups in the slots of a mini-muffin pan.


4. Fill up the jello shot cups with the cupcake mix.  I filled the cups up too high, I suggest only filling them up halfway.


5. Place them in a 325 degree F oven and cook for 20 minutes.


6. See, I definitely filled them too high.  If yours happen to look this way, just cut off the edges.  I left some of the edges on, I mean we are going to just eat them anyways!


7.  When the cupcakes are completely cooled, poke them with a fork.  With the left over rum, pour 1 teaspoon of rum on each of the cupcakes.


I put the cupcakes in my cupcake container so that I could transport them to Tampa for the game.

Directions for the whipped cream:

1. Place a large glass bowl and your whisks for an electric mixture in the freezer for about 10 minutes.  This ensures that the whipped cream turns out just perfect.


2. Add the heavy cream and sugar to the bowl.


3. Begin whisking on a medium speed. 


4. When you notice the mixture slightly thickening, you can increase the speed of the mixer.


5. The whipped cream will be finished in about 3 minutes.  Make sure that you can see soft peaks.  Also, make sure that you do not overmix.  If you overmix, the whipped cream will start to separate and become watery.


6. Place in a glass bowl and store in the refrigerator.  This will last a few days.  If it starts to get a little watery, use a whisk to mix it together and it will be as good as new.


Introducing... Mini-Coconut Rum Cupcake shots with homemade whipped cream!

I can't wait to surprise my husband with his birthday/game day treat!

Until next time...
-A 


In need of sugar!

Sometimes, I have an urge.  An urge for sugar! I don't require sugar everyday.  I don't require sugar after every meal. But, tonight, I was in need for some sugar.  I usually only buy what we need.  I don't have snacks in our pantry; we don't buy stuff for the freezer.  I buy exactly what we need, we eat it, and move on.  That being said, I did not have anything to satisfy my sweet tooth.  But I did, however, have an apple, some real sugar, oatmeal, butter, and cinnamon.  And... an easy apple crisp was born... made just for one.  And I must tell you... it did satisfy my need for sugar!

Ingredients:
1/2 of an apple of your choice, diced
1 teaspoon cinnamon
1 tablespoon dried oatmeal
2 teaspoons sugar
2 teaspoons butter
1 tablespoon brown sugar

Directions:


1. Dice 1/2 of an apple. You can leave the skin on if you would like.


2. Add the cinnamon and white sugar to the apples. Mix well.


3. In a separate bowl, melt the butter, and mix the oatmeal and brown sugar to the butter.


4. Sprinkle the oatmeal mixture on top of the apple mixture.


5. Bake in a 400 degree F oven for about 20 minutes.


Super simple, easy ingredients, and very satisfying!


Until next time...
-A 

Wednesday, September 26, 2012

Cauliflower Pizza

In going with the low-carb theme, we made a no-carb pizza this past weekend.  I have made it before, but my mom was dying to try it.  So, we made it without hesitation.  It did not turn out exactly like the one I had made at home, but it was delicious.  Since we could not all agree on the specific toppings we wanted to add, we made a topping station where we could specialize our own pizza.  We had mushrooms, jalapenos, turkey meat, ham, basil, goat cheese, sweet peppers, and probably more.  After eating it, we didn't feel completely full because we weren't eating a whole pizza of carbs. This is definitely a dish you should try if you are trying to watch the flour.  You could add anything to the top to make it just the way you like it.  Just follow these simple steps to make the base, and enjoy!

Ingredients:
1 cup riced cauliflower (steps to follow)
1 egg
1 tsp. garlic salt
1 tsp. dried basil
1 tsp. dried oregano
1 cup mozzarella cheese
toppings of your choice
pizza sauce of your choice

Directions:


1. Chop the cauliflower into pieces.  


2. Add the chopped cauliflower to the food processor.  This will rice the cauliflower.


3. Place 1 cup of the cauliflower in the microwave with 1/4 cup water.  Cook in the microwave for 5 minutes.


4. Add the spices, egg, and cheese to the cauliflower mixture.


5. Mix well.


6. Place on a non-stick cookie sheet and spread it out to look like a real pizza.  You may think that it feels a little strange, but I promise, it will cook the right way.  It cooks better if you make smaller pizzas.

7. Place in a 450 degree F oven for about 15 minutes.  The above picture is what it should look like when it is done.  


8. Add your toppings to the cooked cauliflower crust. The above picture is a few of the toppings that we set out for people to choose from.


9. After you place your toppings on your personalized pizza, place in the oven on Broil for a few minutes until the top is golden brown and bubbling.


Until next time...
-A 

Tuesday, September 25, 2012

Chores and Stuffed Shells

We live in a one bedroom apartment.  It is a rather large one bedroom apartment, but still, just one bedroom, one living room, nice kitchen, and a bathroom.  When we clean, we usually tag-team and it takes up a good thirty minutes.  Long time huh? Well, T is not here, so I had to battle the place on my own, it will probably take about an hour.  If cooking were my only chore, I would love to do chores all day! But, unfortunately, that is not my only chore.  The place has been needing to be cleaned for quite sometime and I have been putting it off over and over again.  Well, something inside me made me clean when I got home from work.  I deep cleaned the kitchen, deep cleaned the bathroom, washed all of the rugs, vacuumed, and after I eat my little dinner, I have to do my most dreaded chore... ironing.  If you followed me when we were in London, you know that I despise ironing!

Anyways, enough about chores.  The real reason I am here is to show you the quick and easy recipe that I am eating for dinner tonight.  I am SO glad that I had these stuffed shells in my freezer, ready to eat, after my dreadful afternoon of cleaning.  I made my homemade ricotta this weekend at my parents house.  I just had to show them how 'cool' it was! We decided to make some stuffed shells and freeze them for a later date.  Right now, I am thanking this clever idea that we had.  Here is how I made them!

Ingredients:
1 package of giant shells
3 cups of ricotta
2 tablespoons of my secret italian spice
**(My mom and I bought this spice in Italy 4 years ago, and we have been obsessed ever since.  Unfortunately, most of you will not have this Italian spice brought back all the way from Italy.  To make it, mix together, 1/4 cup red pepper flakes, 1 tablespoon garlic salt, 1 tablespoon onion powder, and 1 tablespoon dried basil. Combine all of these ingredients and you will have it for a while.)
1 egg
1 cup shredded mozzarella cheese

Directions:

1. Put the ricotta in a medium sized mixing bowl.


2. Add the egg to the ricotta.


3. Add the special Italian spice.


4. Add the mozzarella cheese.  Mix all of the ingredients well.

5. Meanwhile, cook the giant shells for half of the time it says on the box.  My box said 10 minutes, I cooked them for 5.


6.  Add the mixture to a plastic bag.  Cut a small slice at one of the corners.  You will use this to put the mixture inside of the shells.


7. When the shells are cooled, or easy to handle, put about 2 tablespoons of the ricotta mixture into each of the shells.


8. Place the stuffed shells on a cookie sheet and put them in the freezer for about 1 1/2 hours.


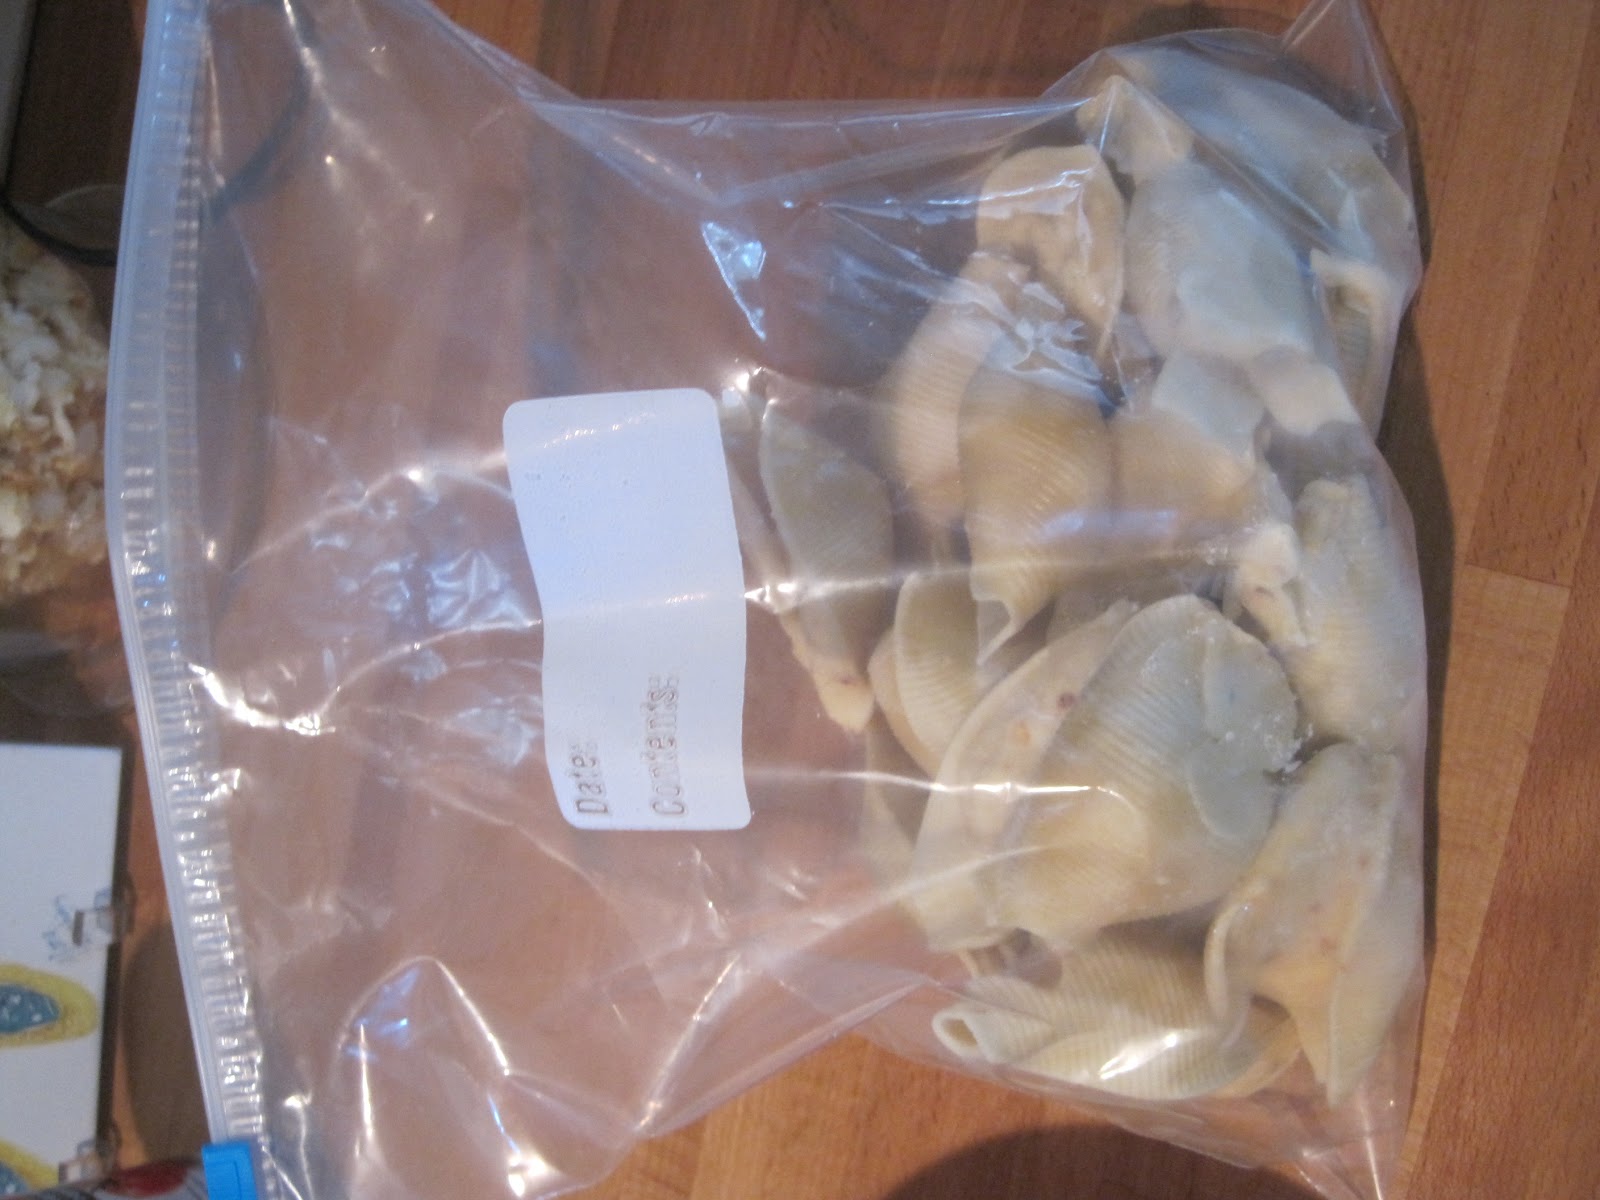
9. When they are finished, they will look like this.  Even though the mixture may look like it is spilling out, it is frozen and will not spill in the bag.


10. Take them off of the cookie sheet and place them in a freezer safe bag.  They should last up to 1 month.

To heat them up later...

1. Take the amount that you want out of the freezer.  Let them thaw for about 10 minutes.

2. Put them in a oven safe dish.  Pour your choice of sauce over them.  I used a tomato, basil sauce with ground turkey meat.

3. Bake them in a 400 degree F oven for about 20 minutes until they are bubbly. You can add a little bit of cheese on top to get the extra golden brown deliciousness! 

Until next time...
-A 


Monday, September 24, 2012

Delicious Oatmeal Casserole

This past weekend was great! It was nice and relaxing.  We planned for new recipes, we cooked new recipes, we devoured new recipes, we watched FSU win, we drank wine spritzers, we ate cupcakes, we went to a farmers market, we had a great time.  It was my idea of a great weekend! Cooking recipes, spending time with my family, trying new things, and walks on the beach...perfect.  Oh, and I got to snuggle with two cute little boxers which is always a plus!

On Saturday morning, we decided to try and make an oatmeal casserole.  I love oatmeal.  I pretty much eat it every day.  I try to switch it up by adding a little dried fruit, different toasted nuts, some brown sugar, etc.  So, why not try an oatmeal casserole?  It ended up turning out great! However, you could probably just put the extra ingredients in your morning oatmeal and it would be just as delicious!

Ingredients:

2 cups gluten-free oatmeal (you could use regular)
1/3 cup brown sugar
1 teaspoon baking powder
1 teaspoon cinnamon
1/2 teaspoon salt
1 cup walnut pieces (chopped)
1 cup raspberries
1 cup blueberries
1/2 cup chocolate chips
3 tablespoons butter
2 cups milk
1 large egg
1 tablespoon vanilla extract
Directions:


1. Preheat the oven to 400 degrees F.  Grease a baking dish of your choice.


2. Combine the oatmeal, brown sugar, baking powder, cinnamon, salt, 1/2 of the walnut pieces, 1/2 of the raspberries, 1/2 of the blueberries, and 1/2 of the chocolate chips.  The other 1/2 of some of the ingredients will be used for the top of the casserole.


3. In a separate bowl, combine the butter, milk, egg, and vanilla extract.


4. After mixing the dry ingredients, place in the greased baking dish.


5. Pour the wet mixture over the dry ingredients.  Shake the baking dish a little so that the wet mixture is displaced evenly.  

6. Sprinkle the rest of the ingredients on the top of the casserole.  (blueberries, raspberries, chocolate chips, and walnuts.


7. Place in the oven for 35-40 minutes. Serve warm.  


Until next time...
-A